[Fun] Revisiting 3D Scanning of Oneself
Late update: 22-Oct-2015
Some time ago I created a post of a project where I used an app to scan an object and create a 3D model out of it. It was pretty cool but the problems were long waiting time for the online server to generate the model, and the rather low quality. There are typically 2 ways to create a 3D model by scanning. One is to use a series of photos taken at different angles and stitch them together, two is to use a depth camera to generate "point clouds". In both cases noise is a real issue and is a major source of low quality. Another issue is the ease of performing the scan and later on polishing the model (e.g. filling holes, smoothing edges). In most cases the camera has to move around the subject super slow or several times to get a good collection of data.
Of course this doesn't stop people from figuring out better ways to scan. Recently I come across an interesting software called "Skanect" [link], which uses a variety of depth cameras to scan objects and spaces. It's surprisingly accurate. The neat thing about this particular software is it only requires one depth camera for scanning, provides an easy to use interface to perform the scan and fix some defects, and best of all, has a free version for non-commercial use. The catch, however, is the free version limits the number of polygons exported, thus limiting the resolution of the 3D model. But this is where my Blender skill comes in, and I'm going to describe the whole process for creating these amazing 3D statue renderings to you.


Step 1: Use Skanect to scan someone on a swivel chair
The process is quite simple once you have watched the tutorial from the Skanect website, so I'm not going to repeat everything here. But the idea is to connect a depth camera (I used a MS Kinect) to your computer, run the program and start scanning.
The way the scanning is done is quite ingenious. Since the single Kinect has to see every side of the person, either the Kinect has to go around the person, or the person turns around. Here the person is going to sit in a swivel chair and rotate themselves, starting from facing the Kinect. The software will let you know the scanning is good by showing a green real-time rendering of the person, and when it has collected enough data.
Next you go through "Fusion", "Watertight", Fill Holes" as indicated in the software. And finally you can export the scan in a number of 3D file formats. I typically use .ply as it has the mesh as well as the color information, all in one file.
Step 2: Load into Blender and adjust
Blender has the ability to import .ply files so it's all good. The only thing that you might need to do is to scale the 3D object. Check the scale and dimensions in the properties panel (press 'N') to verify. The .ply file uses vertex paint instead of face paint, so you won't be able to see the color by default. To see it you'll have to add a material and turn on "Vertex Color Paint", and switch to "Vertex Paint mode" in the main screen. But since we are making statues, this is not necessary, and the next part will likely destroy the coloring anyway.
Then comes the most laborious part of the process. Even though the Skanect software is pretty good at fixing defects, there will still be extra vertices and faces (things that are inside the mesh, or outside due to noise). The person might also happen to tilt their head or leaned sideways. So you'll first adjust their posture by some rotation, then go into Edit Mode and remove/move the extra stuff. How to do that really depends on the artistic decisions made by you. It usually will take me 30 minutes to an hour to get to a point where I'm happy with the mesh.
Step 3: Strategically bisect the model and set rendering parameters
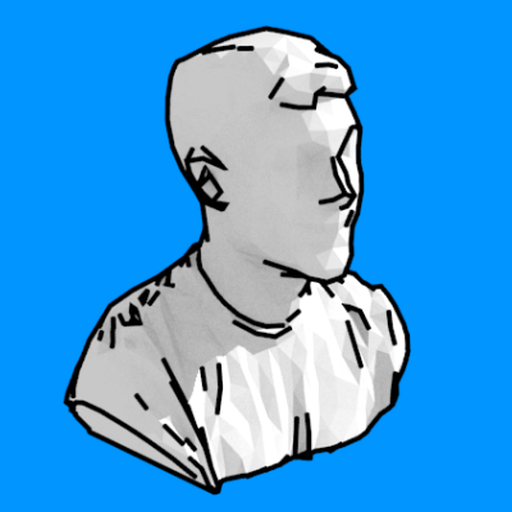
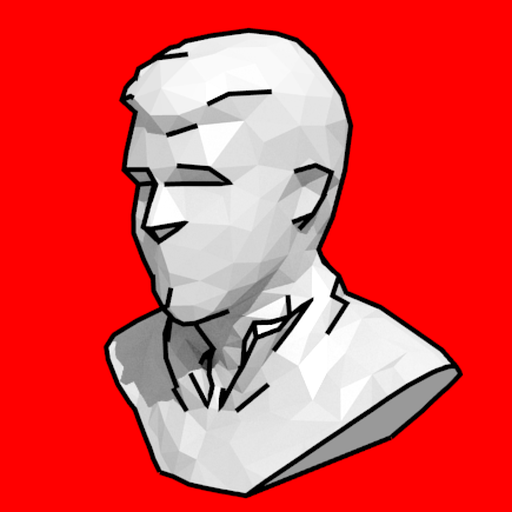
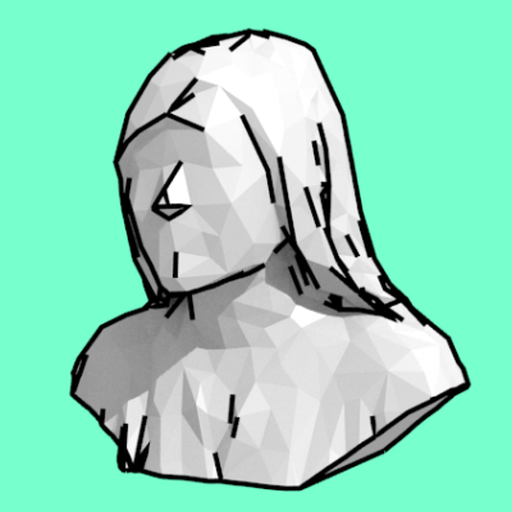
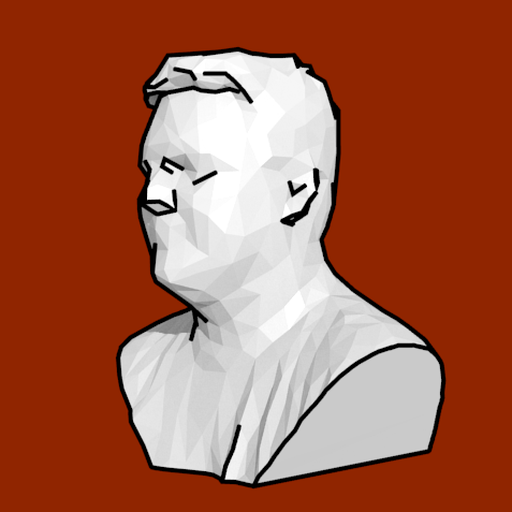
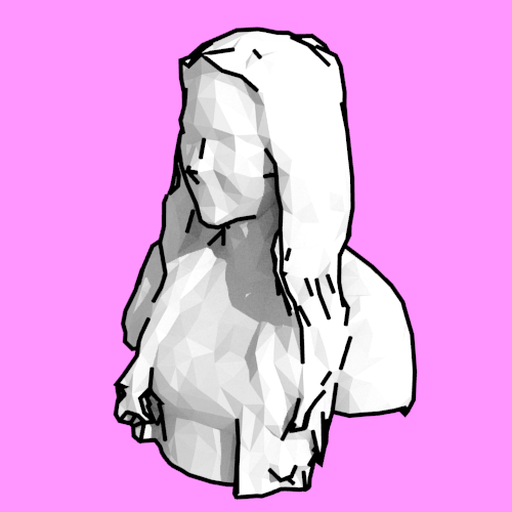
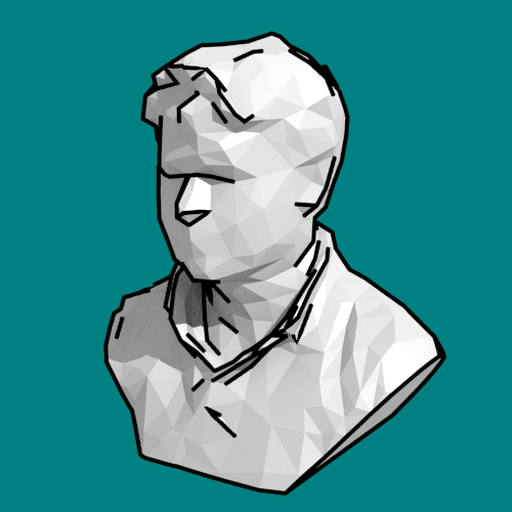
Since I'm aiming at making bust statues, I'd cut off everything below chest, and part if not all of the shoulders. This is also a practical decision as the lower part of the scan tend to get more complex and noisy. Blender provides a very useful tool called "bisect" which allows you to divide the mesh into two with a plane, and choose what to discard. Again how much you want to cut depends on you. But I tend to keep as far down as possible in case of longer hair (see the purple one for example).
The black strokes are another artistic decision and is achieved by enabling the "Freestyle" option. Below is a snapshot of the final staging of the model.
The process is quite simple once you have watched the tutorial from the Skanect website, so I'm not going to repeat everything here. But the idea is to connect a depth camera (I used a MS Kinect) to your computer, run the program and start scanning.
The way the scanning is done is quite ingenious. Since the single Kinect has to see every side of the person, either the Kinect has to go around the person, or the person turns around. Here the person is going to sit in a swivel chair and rotate themselves, starting from facing the Kinect. The software will let you know the scanning is good by showing a green real-time rendering of the person, and when it has collected enough data.
Next you go through "Fusion", "Watertight", Fill Holes" as indicated in the software. And finally you can export the scan in a number of 3D file formats. I typically use .ply as it has the mesh as well as the color information, all in one file.
Step 2: Load into Blender and adjust
Blender has the ability to import .ply files so it's all good. The only thing that you might need to do is to scale the 3D object. Check the scale and dimensions in the properties panel (press 'N') to verify. The .ply file uses vertex paint instead of face paint, so you won't be able to see the color by default. To see it you'll have to add a material and turn on "Vertex Color Paint", and switch to "Vertex Paint mode" in the main screen. But since we are making statues, this is not necessary, and the next part will likely destroy the coloring anyway.
Then comes the most laborious part of the process. Even though the Skanect software is pretty good at fixing defects, there will still be extra vertices and faces (things that are inside the mesh, or outside due to noise). The person might also happen to tilt their head or leaned sideways. So you'll first adjust their posture by some rotation, then go into Edit Mode and remove/move the extra stuff. How to do that really depends on the artistic decisions made by you. It usually will take me 30 minutes to an hour to get to a point where I'm happy with the mesh.
Step 3: Strategically bisect the model and set rendering parameters
Since I'm aiming at making bust statues, I'd cut off everything below chest, and part if not all of the shoulders. This is also a practical decision as the lower part of the scan tend to get more complex and noisy. Blender provides a very useful tool called "bisect" which allows you to divide the mesh into two with a plane, and choose what to discard. Again how much you want to cut depends on you. But I tend to keep as far down as possible in case of longer hair (see the purple one for example).
The black strokes are another artistic decision and is achieved by enabling the "Freestyle" option. Below is a snapshot of the final staging of the model.

There are several reasons why this rendering style works for me. One is due to the limitation of the free software, I start off with a low-poly mesh, which goes well with my preference of low-poly styling. I could potentially "subsurface" it for a smoother finishing but I just like this style too much. Two is the strokes really highlight the contours and give the rendering an almost comical feel, which I enjoy a lot (think Alphonse Mucha).
Making the whole thing in Blender also lets me add in other stuff to the scene. One interesting idea came across when my buddy asked if his statue could sit on a column. What a great idea!
Making the whole thing in Blender also lets me add in other stuff to the scene. One interesting idea came across when my buddy asked if his statue could sit on a column. What a great idea!

Having everything in 3D means adjusting the camera angle and lighting super easy. I'm also planning to make use of the physics simulation in Blender to render some cool animations, like exploding statues, bullet through shattering... etc.
Eventually I'll be 3D printing them to make little physical statues. Stay tuned!
Eventually I'll be 3D printing them to make little physical statues. Stay tuned!
