[Fun] 3D Modelling Your Favorite Objects
Last update: 8-Mar-2015
With better graphics capability and algorithms, many computation devices are now capable of handling 3D objects, as evidenced by more and more 3D games, even on a mobile device. Recently I came across with an augmented reality (AR) tool called "Vuforia" which uses any image as a trigger for an AR object to appear inside your mobile device's screen. Apart from some tricky setting up, the process is surprising easy. Better yet, one can program the whole thing in Unity3D. However, I'll leave this for another article.
After the first trial of using stock 3D models (cube, sphere, particle systems...), I realized it would be even cooler if I can use objects that I have in the physical world. Turns out I can. Here I'm going to take you through the whole process so you can do it as well. All the software tools I use are free, and once you get the idea, the process is pretty straight forward.
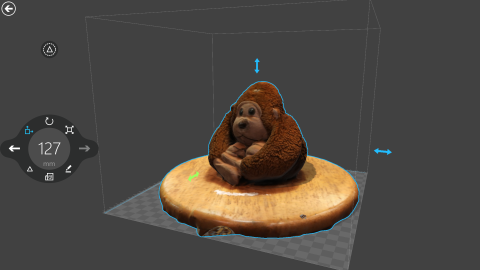
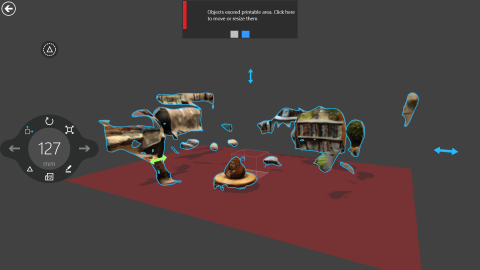
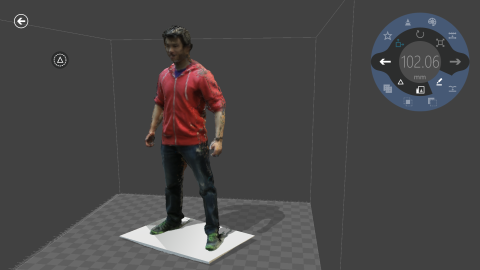
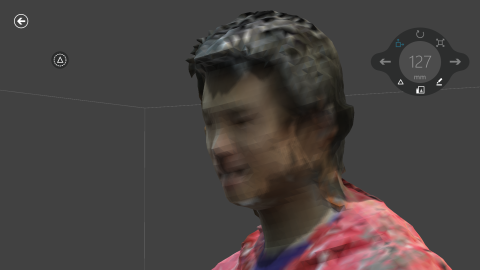
The images above show you a few snapshots of the process within Microsoft's 3D Builder app, which is essential to the whole process. But this is not the starting point. Let's go over the process step by step.
Step 1: Scan your object using the 123D Catch iOS/Android app from Autodesk [Link]
First install the app from the AppStore or PlayStore into you mobile device. You'll then have to create an account with Autodesk (for free) so you can upload the captures and have the service do the modelling for you. The app is pretty straight-forward and you just have to follow the instructions. Here are some important points:
Step 2: Upload the captures and wait
Once you are done with the scan there is a button for your to upload the photos you just took. The Autodesk service will then combine all the photos and create a 3D scene. This will take about 30 minutes to an hour, depending on your internet speed and how busy their server is. You can monitor the progress inside the app, but sometimes it will get stuck or inform you of a "server error". Try logging out and logging back in.
Step 3: Download the 3D model into your PC
When your 3D model is ready (the app will say it's finalized). Log into your account and download the 3D model from a web browser (you don't have to install the desktop version of 123D Catch). In the "Models" section you should be able to see the model you have just scanned. Inside you'll have a few file options to download. For our purpose we'll only need the "Mesh Package".
Step 4: Use Microsoft's 3D Builder to open the 3D model [Link]
When you unzip the mesh package, there will be a folder called "mesh" inside, containing a few files. You are going to open the file with the extension ".obj" using Microsoft's 3D Builder. You'll then be prompted to indicate where the .mtl file is and where the .jpg files are. They are all in the same folder as the .obj file.
The .obj file you just opened is a file containing the 3D information of your model and is a pretty standard format, so many 3D software can open it. However, I highly recommend using Microsoft's 3D Builder.
Unfortunately this app is Windows 8.1 only. If you have an older version of Windows, or a Mac, skip to Step 7.
Step 5: Remove the background in the 3D model
The 123D Catch app does a good job in recreating the model of the object, but it also tries to recreate the entire scene. That's why we need a 3D software to remove the background. I use 3D Builder because it's free and it's very easy to use. It also runs very smoothly in my Surface Pro, while many other software will just crash when doing any kind of 3D reconstruction... points to Microsoft on this :)
The image on the right above is a screenshot of the entire scene captured by the 123D Catch app. As you can see there are a lot of unwanted artifacts. The image on the left above is a screenshot of the finished model after removing them.
Step 6: Export the model in .ply format
Once you are happy with the model, you'll save the model in the .ply format, instead of the .3mf or .stl format. The older version of the 3D Builder does not have the option of .ply, so make sure you have the most updated version of this app. It will also ask for a filename of one or more .jpg files. I usually just prefix it with the same name I give the .ply file.
The reason why it has to be in .ply format is that it is the only format from 3D Builder supported by other 3D software, and contains the texture (color) of the model.
Step 7: Use MeshLab to do some final touch up [Link]
Another good job that 123D Catch does is it contains a lot of details for the 3D model, which typically results in a file size of 50+MB. This creates a lot of overhead especially if you are planning to use it in a mobile app. For that you'll need to down-sample the model to fewer faces. MeshLab is a free software that does a lot of 3D touch up (and runs on both Windows and OSX) including down-sampling (Filters > Remeshing, Simplification and Construction > Quadric Edge Collapse Decimation). To what number of faces is an art and depends heavily on what you are modelling, so try out different numbers. Usually 50% is a good start.
If you have a Mac and have skipped from Step 4, you can also select the unwanted artifacts and remove them in MeshLab, just the UI is not as user-friendly and is less snappy as 3D Builder.
Step 8: Export the model in .obj format
Currently Unity3D does not support the .ply format. So you'll have to export the model in yet another format. Fortunately MeshLab supports almost all 3D formats out there, so you are going to save it as one of the most commonly used .obj format, along with a .jpg texture file.
Step 1: Scan your object using the 123D Catch iOS/Android app from Autodesk [Link]
First install the app from the AppStore or PlayStore into you mobile device. You'll then have to create an account with Autodesk (for free) so you can upload the captures and have the service do the modelling for you. The app is pretty straight-forward and you just have to follow the instructions. Here are some important points:
- The app will tell you to take 2 rounds of photos, for the upper round, hold your device high and tilt it down a bit. This ensures the app knows you are taking the upper round, and also capture the top of the object. If the object is tall (e.g., a human being, a live size statue), you'll really have to hold your device high.
- It's ok to take multiple shots, usually you'll end up having at least 32 shots.
Step 2: Upload the captures and wait
Once you are done with the scan there is a button for your to upload the photos you just took. The Autodesk service will then combine all the photos and create a 3D scene. This will take about 30 minutes to an hour, depending on your internet speed and how busy their server is. You can monitor the progress inside the app, but sometimes it will get stuck or inform you of a "server error". Try logging out and logging back in.
Step 3: Download the 3D model into your PC
When your 3D model is ready (the app will say it's finalized). Log into your account and download the 3D model from a web browser (you don't have to install the desktop version of 123D Catch). In the "Models" section you should be able to see the model you have just scanned. Inside you'll have a few file options to download. For our purpose we'll only need the "Mesh Package".
Step 4: Use Microsoft's 3D Builder to open the 3D model [Link]
When you unzip the mesh package, there will be a folder called "mesh" inside, containing a few files. You are going to open the file with the extension ".obj" using Microsoft's 3D Builder. You'll then be prompted to indicate where the .mtl file is and where the .jpg files are. They are all in the same folder as the .obj file.
The .obj file you just opened is a file containing the 3D information of your model and is a pretty standard format, so many 3D software can open it. However, I highly recommend using Microsoft's 3D Builder.
Unfortunately this app is Windows 8.1 only. If you have an older version of Windows, or a Mac, skip to Step 7.
Step 5: Remove the background in the 3D model
The 123D Catch app does a good job in recreating the model of the object, but it also tries to recreate the entire scene. That's why we need a 3D software to remove the background. I use 3D Builder because it's free and it's very easy to use. It also runs very smoothly in my Surface Pro, while many other software will just crash when doing any kind of 3D reconstruction... points to Microsoft on this :)
The image on the right above is a screenshot of the entire scene captured by the 123D Catch app. As you can see there are a lot of unwanted artifacts. The image on the left above is a screenshot of the finished model after removing them.
Step 6: Export the model in .ply format
Once you are happy with the model, you'll save the model in the .ply format, instead of the .3mf or .stl format. The older version of the 3D Builder does not have the option of .ply, so make sure you have the most updated version of this app. It will also ask for a filename of one or more .jpg files. I usually just prefix it with the same name I give the .ply file.
The reason why it has to be in .ply format is that it is the only format from 3D Builder supported by other 3D software, and contains the texture (color) of the model.
Step 7: Use MeshLab to do some final touch up [Link]
Another good job that 123D Catch does is it contains a lot of details for the 3D model, which typically results in a file size of 50+MB. This creates a lot of overhead especially if you are planning to use it in a mobile app. For that you'll need to down-sample the model to fewer faces. MeshLab is a free software that does a lot of 3D touch up (and runs on both Windows and OSX) including down-sampling (Filters > Remeshing, Simplification and Construction > Quadric Edge Collapse Decimation). To what number of faces is an art and depends heavily on what you are modelling, so try out different numbers. Usually 50% is a good start.
If you have a Mac and have skipped from Step 4, you can also select the unwanted artifacts and remove them in MeshLab, just the UI is not as user-friendly and is less snappy as 3D Builder.
Step 8: Export the model in .obj format
Currently Unity3D does not support the .ply format. So you'll have to export the model in yet another format. Fortunately MeshLab supports almost all 3D formats out there, so you are going to save it as one of the most commonly used .obj format, along with a .jpg texture file.
So there you have it, the whole process of capturing your favorite object in 3D with your mobile device, then a few tweaking of the model and file format. In fact, Step 8 is to prepare your model to be used by many other 3D development tools, like Unity3D. We'll talk about that next time.
And yes, you can even scan yourself with the help of your friend, and turns out 3D Builder has a built-in tool doing that, provided that you have a Kinect v2 and a decent laptop (MS Surface Pros won't do). You can also use a software called "Kinect Fusion" by Microsoft to do a more detailed point-cloud-based scanning. However, this turns out to be not that good for our purpose because it has too many data points and requires an extra step to convert the point-cloud into faces in MeshLab, not to mention a decent graphics card is required for the scanning. Nevertheless, the above image is a scan of myself, in case you wonder how it looks like.
And yes, you can even scan yourself with the help of your friend, and turns out 3D Builder has a built-in tool doing that, provided that you have a Kinect v2 and a decent laptop (MS Surface Pros won't do). You can also use a software called "Kinect Fusion" by Microsoft to do a more detailed point-cloud-based scanning. However, this turns out to be not that good for our purpose because it has too many data points and requires an extra step to convert the point-cloud into faces in MeshLab, not to mention a decent graphics card is required for the scanning. Nevertheless, the above image is a scan of myself, in case you wonder how it looks like.


