[Fun] 2016 Christmas Card
Last update: 27 Dec 2016
Every year I make a Christmas card for my friends and family. Sometimes I make a video, sometimes I make an image. In 2015 I made a more traditional image using the Blender low-poly modeling skill I picked up over the year.
Every year I make a Christmas card for my friends and family. Sometimes I make a video, sometimes I make an image. In 2015 I made a more traditional image using the Blender low-poly modeling skill I picked up over the year.
|
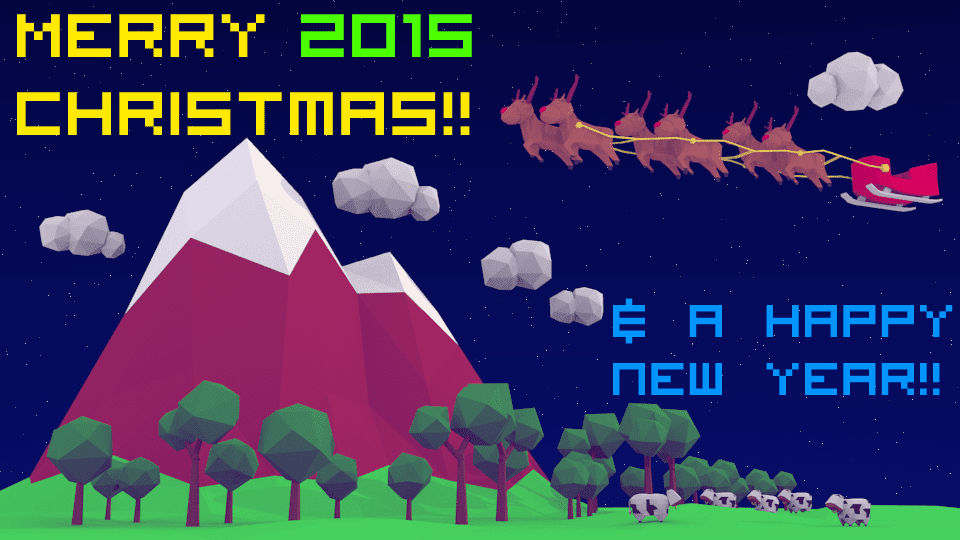
The low-poly Christmas Card I made in 2015. I re-used some of the models I made over the year (the background), and added the reindeers and sleigh.
|
What's interesting about 3D modeling is that you get the entire object that you can view in any angle, and you can easily change its colour and modify its shape. So this year I decided to put a twist to it and used the Augmented Reality (AR) tool I picked up to make an AR Christmas Card.
|
|
The AR Christmas Card I made in 2016. This is a screenshot of the app when the camera sees the snowflake pattern, which can be on a display, or a printed paper. When rotated the model will also rotate, as if it is anchored to the pattern.
For more details and get the app, visit my itch.io page here: https://victorcheung.itch.io/2016-ar-christmas-card |
Now I'm going to use this page to explain how I did it, with the hope that you can also use the concept to make your awesome AR app. You'll need some background knowledge about 3D modelling (preferrably Blender) and Unity. The AR tool I use is a library called Vuforia.
Building the 3D model
So first off you'll need a 3D model that you want to show up in the AR scene. It can be a number of models in separate files. If you want the models to be animated, you can also add the animations here. It does not matter in what dimension your model is in, as you can scale it later in Unity. However, for the sake of simplicity, you'll want to keep all models of a similar scale so you can keep using the same scaling parameters.
If you don't want to model, you can also download one made by others and use it as is. Thingiverse is a good resource, but you are at the mercy of the model's creator to have a good model. In some cases your model won't have any colour (e.g., in .stl format), or scaled strangly (since they are mostly made for 3D printing) -- they can be fixed in Blender, or partially in Unity.
|
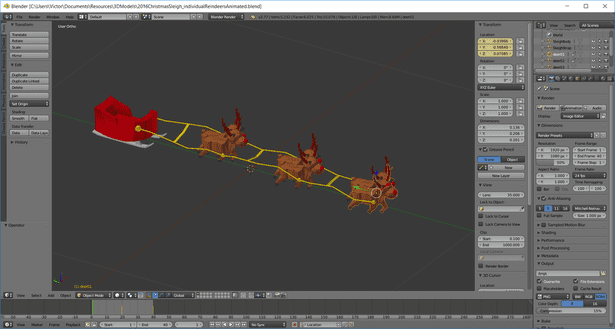
The 3D model of the reindeers and sleigh in Blender. Each reindeer is also animated (but I ended up replacing them with the animator in Unity).
|
Getting the Vuforia target database
Next you are switching to Vuforia. It's an AR SDK made by Qualcomm and later on acquired by PTC. The basic idea of this SDK is to make an app recogize some patterns, track them, and overlay 3D models on top of them, all done in realtime. What you need, however, is the target database generated on their developer website so the app knows what to recognize. There are two options: through the cloud, and completely offline. The prior has the flexibility of updating what's recognized and shown online, subjected to some subscription fees, while the latter is tied to what your offline database has and can only be updated by updating the app itself (actually the exact terms are more complicated than this, so go to their pricing webpage to see your exact options).
I use the latter because it's free for non-commercial use. Here are the steps.
- Get a free developer account from Vuforia. This lets you use their service in generating the database and getting the SDK, plus some tutorals.
- Download the SDK for Unity at the developer portal > Downloads > SDK.
- Create a license key for the app at Develop > License Manager. Copy the long string to notepad.
- Design your patterns. You have to make something that has enough recognizable features, like curves, corners, crosses. And not rotatory symmetric, otherwise the app won't be able to determine where your model should face. A photo would also work.
- Add a database at the developer portal > Develop > Target Manager, and upload all your patterns to it.
- You can then download the database under its name, this page also tells you how good your patterns are for recognition. You can later on add more patterns and download the database again.
- The database version you use will be as a Unity Package.
|
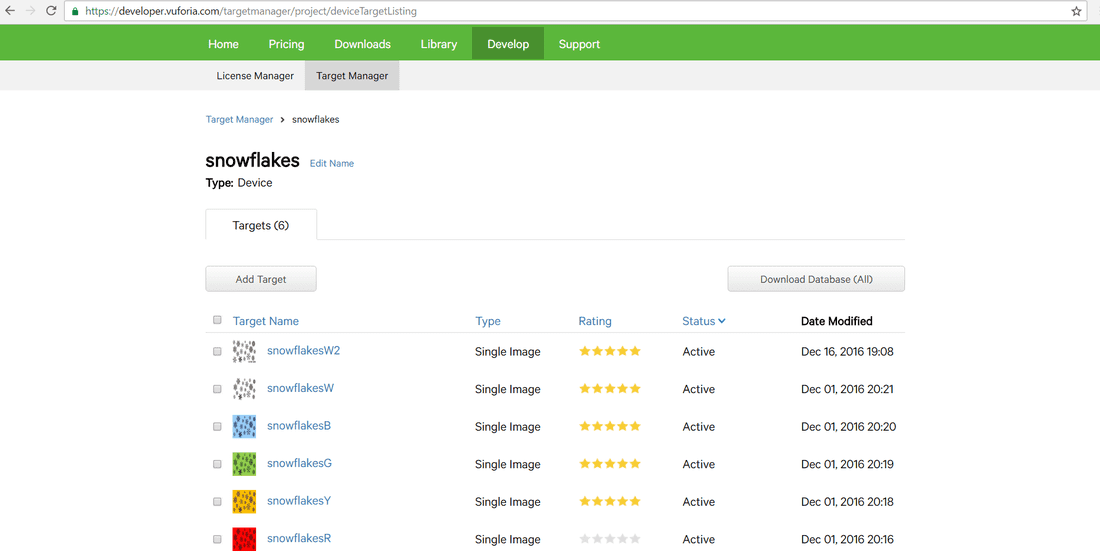
The Target Manager page at Vuforia developer portal, from where you get the target database as well as the license key for your app.
|
Making the app
With the model, Vuforia SDK, and the target database ready you are moving on to Unity. One neat thing about Unity is that you can drag the Blender file straight into it as Assets. This however means you'll have to remove all other stuff in the Blender file, for example, light sources, camera, models in other layers ...etc. You'll also have to apply all the transforms (Ctrl+A in Object Mode) and modifiers. The Vuforia SDK and the target database are two unity packages to be imported.
With all things imported, these are the steps that follow:
- Create an empty scene (or use the default and remove everything, including the main camera), then drag the ARCamera prefab from the Assets > Vuforia > Prefabs folder. At the inspector choose the database you just imported and make it active (you can have mulitple databases), also fill out the App License Key field with the key you copied earlier.
- Drag the ImageTarget prefab from the same folder to the scene. This will be the image triggering your 3D model, and in the inspector you will be able to choose which image it is going to look for. Normally I'll set its position to (0, 0, 0) but this does not seem to be really necessary.
- Drag the 3D model you have under the ImageTarget gameobject as a child. You might have to reposition and rescale the model relative to the ImageTarget. You can add as many models as you want. In my case I have the texts, the reindeers & sleigh, the presents, and some directional lights.
|
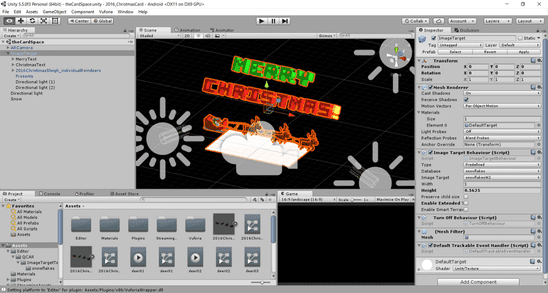
The scene of the AR Christmas Card in Unity, everything in place.
What's happening behind the scene is when the Vuforia code recognizes the pattern, it calls a function of the corresponding ImageTarget, which turns on all the colliders and mesh renderers of its children. Hence you'll want to put all the models as children of the ImageTarget. |
And finally, make sure you have set it as an Android application in File > Build Settings... and things like product name and bundle identifier. Now all you need to do is to connect your Android device and hit Build and Run. Have fun!!
Tips
So here are some extra tips I'd like to cover.
Tips
So here are some extra tips I'd like to cover.
- The current Vuforia SDK v6.2 supports Unity 5.4 or above, so make sure you update your Unity software.
- You can update the database by uploading new patterns, downloading it again, and reimport it into Unity.
- You Android device might have to be set to accept 3rd party app installation.
- The animation can be done in both Blender, and Unity. But for some reasons scripted animation using the position of the model doesn't work. This might have to do with the positioning of the gameobjects by the Vuforia SDK. So localize the animation to the model itself seems to be the only way to go.
- Thanks to Unity's multi-platform support, it is possible to make it into an iOS app. However, you'll need a Mac with xcode installed to do the final compilation and uploading to an iOS device.
