[Fun] Low Poly 3D Modelling
Last update: 28-May-2015
Since the last project about making a 3D model of one's favorite objects [Link], I'm fascinated by the ability to create and manipulate 3D objects with a computer. Just imagine I can make my own simple 3D games with the characters and objects I create. Two neat things I soon realized were those softwares don't require powerful machines for the creation part (I've been using my ultrabook for that), and they are readily available, even for free.
Meanwhile, in the course I'll soon be co-teaching about HCI, we picked a software that is powerful but has a notoriously steep learning curve -- Blender, for the class project about learning how people learn and use a sophisticated software. As a responsible instructor, I started learning a few things about Blender, and to motivate myself I went for something called "Low Polygonal Rendering".
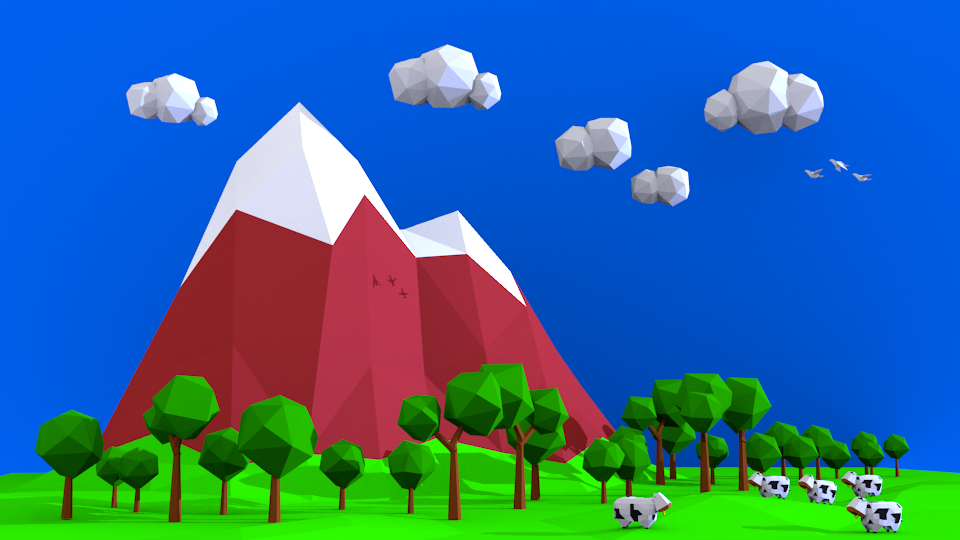
One of the first low polygonal renderings I made using Blender. Took me roughly 4 hours for the scene and trying out various settings, and 3 hours to model a copy of the cows (birds were made by a buddy of mine).
First off while I started from scratch, I was following an online tutorial (http://cgi.tutsplus.com/tutorials/secrets-to-creating-low-poly-illustrations-in-blender--cg-31770), which I highly recommend. Second I chose this style because I really like it. And third not being a 3D artist this style allows me to not worry too much about details and texturing, as everything here is polygons of uniform colors.
If you also enjoy this style and my renderings, here are some tips I've figured out and would hopefully help you to get started.
If you also enjoy this style and my renderings, here are some tips I've figured out and would hopefully help you to get started.
Blender view angle hot-keys
Blender uses a lot of hot-keys. They save you a lot of time but also give you a lot of frustrations because they are modal and non-trivial most of the time. As you are creating a 3D scene you'll constantly be switching between front-, side-, and top-views to make sure the objects are at the correct place. So use 1 for front view, 3 for side view, and 7 for top view (hold ctrl to view the opposite side). If you are using a compact keyboard without a numpad, you'll have to switch on the numpad emulation in the settings.
Low poly matt shading settings
The most iconic features of this style are the non-reflective surfaces and contrasting shades. Interestingly none of them are real. To have non-reflective surfaces you'll need to assign materials with the highest intensity for Diffuse, lowest intensity for Specular. And for contrasting shades, the World has to include Ambient Occlusion of 0.8, Environment Lighting of 0.5 with Sky Color. For more details check out the online tutorial.
Sky settings
In the same World property you'll also be setting how the background (sky) looks. It'll give you a sense of time (dawn, sunset, night ...etc), depending on how you color the settings. Use Horizon for the lower part of the sky, Zenith for the upper part of the sky, and Ambient for overall mood (use black if you want faithful colors). Check Blend so that the gradient from Horizon to Zenith is rendered. You can also add a solid color by adding an extra vertical plane as a backdrop. Starting from v2.7 the Star attribute is removed so to have a stary sky you'll either have to add an image as the backdrop, or use the "Stucci" texture.
Sun settings
Turns out the position and color of the sun are quite important, as they will determine the overall tone/mood of the rendering. Place it on one side at and angle so its ray falls on the side you want to be bright, and set it to the color you want the overall tone to be.
Here are a few renderings I've made. Each took roughly an evening. I should probably create a gallery or some sort.
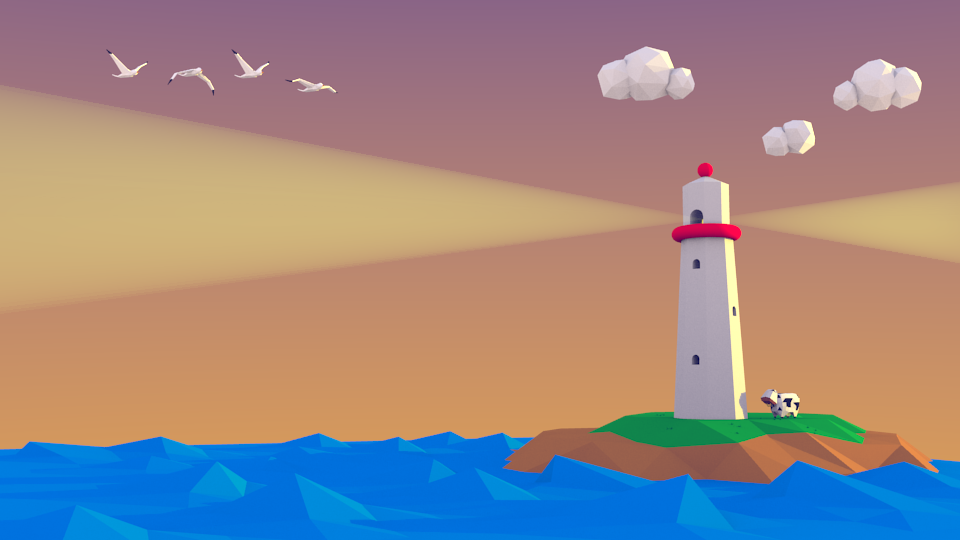
2 useful techniques in this lighthouse scene: the sea is actually made almost exactly the same way as the land, with more vertices pulled up, and the rays are two spot lights with cone being shown.
|
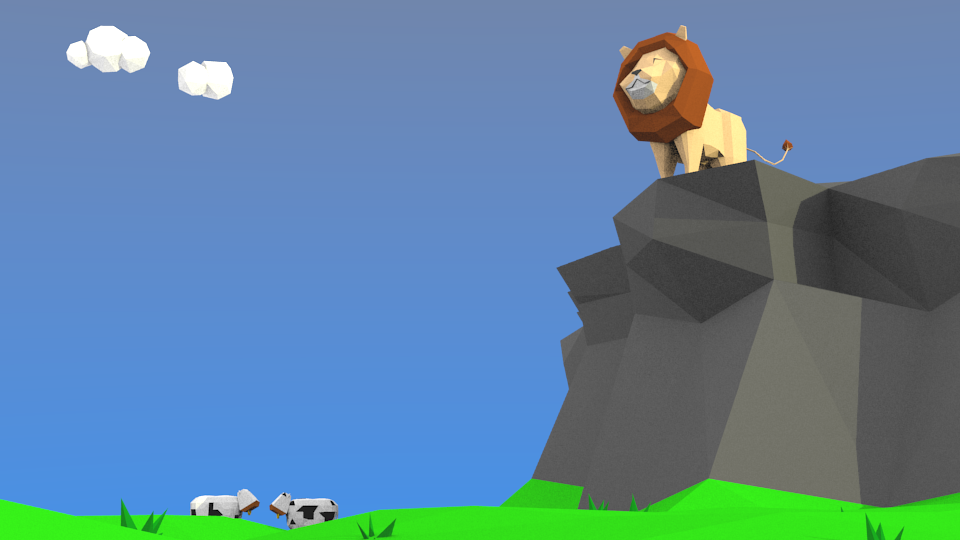
The first time I really spent some time in modelling an animal. The cliff is just a bump pulled way high from the plane.
|
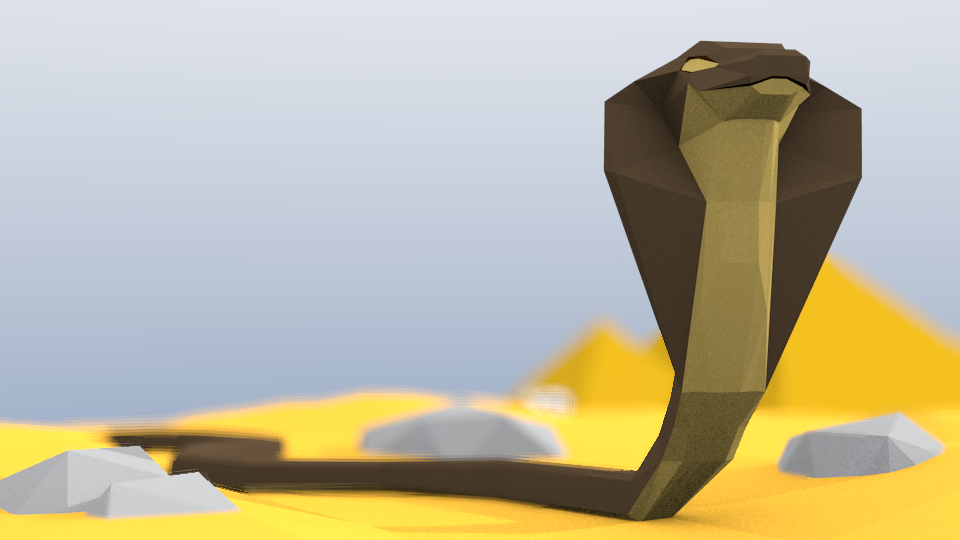
2 useful techniques in this desert scene: the eyelids are made using a special tool called "filled rip", and the depth of field is made using the Node editor.
|
Now if you noticed I've been trying to add some animals to each scenery I create. In fact I'm going to model a bunch of animals and create scenes in which they habitare. As I model them I start to develop my style of those animals: simple legs, triangulated, and low polygon count. They probably won't be the most accurate models, as I'm sort of maintaining a balance between cuteness and realism. But with some image processing they seem to do well for my purposes.
HCI discussion
Fun aside, as an HCI researcher I've paid some attention to the UI design of this software. For powerful tools like these they are almost inevitable to be hot-key-heavy. It's almost impossible to use Blender without knowing a few hot-keys -- it's not just for efficiency. And the mouse is also essential because of the middle wheel (touchpad doesn't seem to provide the full functionality). For use cases like these it's hard to replace the input configuration.
It's very interesting to realize that the famed "natural user interface" probably won't apply because there is no such thing in complex softwares like Blender. However it would be beneficial to investigate how the learning curve be flattened so more people can get to use it. It'll also be interesting to see if the new virtual reality will add value into seeing the models in 3D in real time.
Great potential
I believe that there are a lot of potential usages of these 3D models. As 3D models are representations of objects of our 3D world, it's very easy to change the camera angle and positions of the objects to create any scenery one wants. Plus, it's infinitely customizable: duplicate, resize, recolor ...etc. One can even create things that don't exist in the real world (unicorn?). The direct application of these would likely be conceptualizing products and 3D gaming. But for artwork like above (shamelessly claiming it is art~) they are pretty capable of as well.
With the proliferation of 3D printing one can create literately anything and bring it into reality. Being able to easily create a 3D model would be an important step in popularizing 3D printing to the general public (think making your own boardgame avatars).
